The first backpack I ever carried into the mountains was borrowed, too big, and packed like I was fleeing a natural disaster. By noon on the first day, my shoulders felt like they'd been wrung out. My lower back had opinions. I spent more time adjusting straps than looking at the scenery. That experience taught me something important: the pack on your back shapes the entire trip. Get it right, and the miles feel manageable. Get it wrong, and you'll think about nothing else.
Choosing the right backpack for hiking and camping isn't complicated, but it does require a bit of honest thinking. Not about which brand looks best in photos, but about what you're actually doing out there, what gear you're carrying, and how your body handles weight. This guide walks through all of it.
What Kind of Hiking or Camping Trip Are You Buying This Backpack For?
Before you look at a single pack, answer one question: what are you going to use it for? A day hike in the Appalachians needs something fundamentally different from a five-night backcountry trip through the Rockies or a long-distance walk like the Camino de Santiago. Your intended activity determines three things: capacity, suspension system, and durability.
- Day hikes: You need quick access, light weight, and enough room for water, snacks, and a rain layer. Simple suspension is fine.
- Weekend backpacking (1 to 2 nights): Now you're carrying a sleeping bag, shelter, food, and a cook kit. The pack needs a proper hip belt and internal frame.
- Multi-day backpacking (3+ nights): More food, possibly more clothing, and the suspension must handle heavier loads over longer distances.
- Long-distance treks (Camino, AT thru-hike, PCT sections): Durability becomes critical. You need a pack that will survive weeks or months of daily use, with a back system that stays comfortable day after day.
Conditions matter too. If you're hiking in the humid heat of the southeastern U.S. or the desert Southwest, ventilation and hydration management jump up the priority list. Shoulder-season trips at altitude might mean bulkier insulation layers, which changes your capacity needs. Start with the trip, and the right pack follows.
How Do You Choose the Right Backpack Size (Liters) for Hiking and Camping?
Here's where most people go wrong. They pick a backpack capacity based on a vague feeling ("I think I need a 65-liter"), then fill it with whatever they own. The better approach is the reverse: build a detailed kit list first, then choose the size you need to carry that kit.
Pack volume is measured in liters (sometimes cubic inches in older U.S. specifications), but be aware that measurement methods vary between brands. An Osprey 50-liter and a Deuter 50-liter may not hold exactly the same amount. Treat listed capacities as close estimates, not precision measurements. REI's backpack guide offers a useful overview of how these ranges map to trip types.
|
Capacity (Liters) |
Best For |
Typical Use |
|
0 to 10L |
Minimalist essentials |
Short walks, running errands on trail |
|
10 to 20L |
Fast and light day hikes |
Minimal layers, snacks, water |
|
20 to 30L |
Standard day pack |
Extra layers, rain gear, lunch, 2L of water |
|
30 to 40L |
Big day hikes, winter day hikes, hut trips |
More insulation, crampon/ice axe carry, or hut-to-hut gear |
|
40 to 55L |
Ultralight overnights, light multi-day |
Compact sleep system, minimal cook kit, ultralight shelter |
|
50 to 60L |
Typical weekend backpacking |
Standard sleep system, 2-person tent, 2 to 3 days of food |
|
60 to 70L |
Conventional multi-day backpacking |
Bulkier kit, extra clothing, camera gear |
|
70L and above (75, 90 liters) |
Extended trips, group gear, winter expeditions |
Heavy loads, group cooking equipment, cold-weather setups |
Your camping style drives this more than anything. A hiker with a lightweight quilt, inflatable sleeping pad, and tarp shelter might comfortably fit a three-night trip into 40 to 55 liters. Someone carrying a four-season tent, a synthetic sleeping bag, and a full cook kit for the same trip might need 60 to 70 liters. Neither is wrong; they just need different packs.
One firm piece of guidance: don't oversize. A bigger pack invites overpacking. If your pack has empty space, you'll fill it, and the extra weight will punish your knees and lower back. Choose a pack that fits your actual kit, not the kit you might theoretically bring someday.
How Do You Estimate Capacity from a Kit List (Without Guesswork)?
Start by inventorying your big-volume items. These are the ones that eat most of the space in your main compartment:
- Sleeping bag or quilt (compressed size varies enormously; a down quilt might compress to 4 liters, a synthetic bag to 10 or more)
- Sleeping pad (inflatable pads pack small; closed-cell foam pads often strap to the outside)
- Shelter (tent body, fly, poles, and footprint if applicable)
- Insulation layers (puffy jacket, fleece, extra clothing for camp)
- Cook kit and food (bear canister requirements in some backcountry areas add significant volume)
If your sleeping pad won't fit inside, you'll need external strapping options. Same for bear canisters in areas like Yosemite or the Sierra Nevada, where they're mandatory and bulky. Account for these before choosing a pack size.
The best test is a simple one: gather every item on your kit list, stuff it into bags or a borrowed pack, and see how much space it actually takes. No guesswork, no mental estimation. Lay it all on the floor, pack it, and measure. Then add about 10 liters of space as a buffer for food carry on longer trips.
What Features Actually Matter on a Hiking and Camping Backpack (and What's Optional)?
Pack features are a spectrum from essential to nice-to-have to marketing fluff. Knowing which is which saves you money and ounces.
Comfort and Adjustability: The Non-Negotiables
- Padded hip belt: This is where most of the load should sit. A proper hip belt transfers 60 to 80 percent of the weight to your hips. If a pack doesn't have one (or has a thin, decorative one), it's not designed to carry a heavy load.
- Shoulder straps: Should wrap your shoulders comfortably without bearing primary weight. Look for adjustable harness systems on multi-day packs.
- Load lifters: Small straps connecting the top of the shoulder straps to the top of the pack frame. They pull the pack's upper mass closer to your back. Essential for loads over about 10 kg (22 lbs).
- Sternum strap: Connects the shoulder straps across your chest, preventing them from slipping off your shoulders. Should be adjustable in height.
- Compression straps: Cinch the pack down when it's not full. Critical for stabilizing partial loads and preventing contents from shifting on technical terrain.
Organisation and Access
|
Feature |
Pros |
Cons |
|
Top-loader (drawstring + top lid) |
Simple, durable, weather-resistant |
Hard to reach items at the bottom |
|
Panel/zip access (front or J-zip) |
Easy access to any item |
Zippers add weight and potential failure points |
|
Hipbelt pockets |
Phone, snacks, lip balm within reach |
Adds slight bulk to the belt |
|
Stretch front pocket |
Wet layers, map, quick-grab items |
Can snag on brush in dense trail |
|
Side pockets |
Water bottle carry while walking |
Not always reachable without removing the pack |
Side pockets that you can actually reach while carrying a pack are surprisingly valuable. Being able to grab a water bottle without stopping or asking someone to fish it out of your pack changes how often you actually hydrate.
Hydration Compatibility
Most hiking packs include a hydration reservoir sleeve inside the main compartment, with a port for the drinking tube. This is standard for U.S. hikers in hot conditions. The alternative is carrying water bottles in side pockets, which is simpler, lighter, and easier to refill. Many experienced hikers prefer bottles; they're harder to forget at a water source, and you can always see how much you've drunk. A pack that accommodates both gives you the most flexibility.
Attachment Points
Trekking poles attachment loops, an ice axe loop, and gear loops are useful if your trips call for them. If you never use trekking poles or ice axes, these features add negligible weight but no value. Don't pay a premium for features you won't use.
Rain Protection
Your pack will get wet. The question is how you handle it. Three options:
- Pack rain cover: Fits over the outside. Effective in steady rain; useless in wind-driven rain (water enters from the back). Adds 80 to 150 grams.
- Pack liner (trash compactor bag or dedicated liner): Goes inside the pack. Keeps everything dry regardless of wind direction. Cheaper and more reliable than a cover.
- Waterproof stuff sacks: Protect individual items (electronics, sleeping bag). Good belt-and-braces approach when combined with a liner.
Many experienced backpackers use a pack liner as the primary defence and skip the external cover entirely.
Weight vs Durability Trade-offs
A lightweight backpack made from 30-denier fabric will be more comfortable to carry but more vulnerable to abrasion and tears. A heavier pack made from 420-denier nylon will shrug off rocks and brush but adds weight you'll feel over long days. For most hikers, the middle ground (100 to 210 denier, with reinforcements at high-wear zones like the bottom panel and hip belt) offers the best balance. Ultralight packs are wonderful for experienced hikers who know how to handle them carefully; they're less forgiving for beginners learning to navigate tight spots on rocky trail.
How Do You Know if a Backpack Is High Quality and Worth the Money?
Quality isn't about price alone. A £250 pack from a reputable manufacturer with a solid warranty might outlast a £400 pack with flashy marketing and thin fabric. Here's what to actually look for.
- Fabric denier and reinforcements: Higher denier means more abrasion resistance. Check the bottom panel and hip belt wrap for reinforced material.
- Stitching: Look for bar-tack stitching at stress points (where straps attach to the pack body). Single-stitch seams at high-stress points are a red flag.
- Zippers: YKK zippers are the industry standard for durability. Test them in the store; they should glide without catching.
- Buckles: Quality packs use Duraflex or equivalent buckles that can handle cold temperatures without becoming brittle.
- Frame and suspension: An internal frame (aluminium stays or a framesheet, or both) distributes load effectively. Flex the frame in the store; it should return to shape.
Brands like Osprey, Berghaus, and Deuter have built their reputations on durability and comfort. Osprey's All Mighty Guarantee, for example, covers manufacturing defects for the lifetime of the product. That kind of warranty signals genuine confidence in construction quality. You can find these brands and test them at outdoor stores like REI, where staff can also help with fitting.
One thing worth noting: fit varies between brands even within the same liter range. A 50-liter Osprey Atmos may fit your torso and hip proportions differently than a 50-liter Deuter Aircontact. Always try on multiple packs, even if you've already decided on a capacity.
How Should a Hiking Backpack Fit So the Weight Transfers to Your Hips (Not Your Shoulders)?
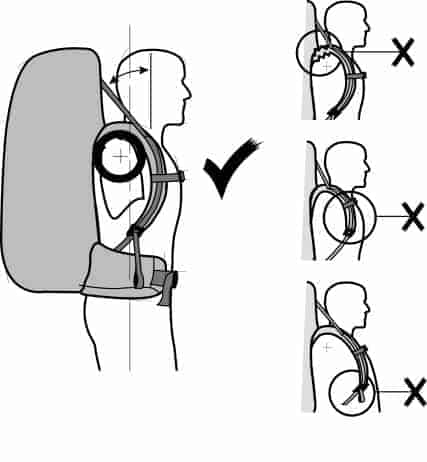
This is the single most important section of this entire guide. A pack that doesn't fit properly will hurt you. Not "mild discomfort" hurt, but numbness in your hands, pain in your shoulders, and lower back strain that can sideline you for days. Correct fit means the hip belt carries the load and the shoulder straps simply stabilise.
Step-by-Step Fitting Process
- Measure your torso length: This isn't your height. It's the distance from your C7 vertebra (the bony bump at the base of your neck) to the top of your iliac crest (the tops of your hips). REI's fitting guide explains the process clearly. Most pack brands offer small, medium, and large torso sizes, or an adjustable suspension that spans a range.
- Set the hip belt on your iliac crest: The padded wings of the belt should wrap around your hip bones, sitting on the tops of your hips, not on your waist. Tighten firmly. This is where most of the load sits.
- Adjust the shoulder straps: They should wrap over your shoulders and make contact without gaps, but they shouldn't be bearing significant downward weight. If you can slide your thumbs easily between the straps and your shoulders, the fit is about right.
- Set the load-lifter straps: These angle from the top of the shoulder straps toward the top of the pack frame at roughly 45 degrees. Pull them gently to bring the pack's upper weight closer to your back. Over-tightening pulls the shoulder straps off your shoulders.
- Adjust the sternum strap: Position it about an inch below your collarbones. It should feel snug but not restrict breathing.
What Good Fit Feels Like vs Red Flags
|
Good Fit Sign |
Red Flag |
|
Weight sits on hips; shoulders feel light |
Shoulder pain or downward pressure after 10 minutes |
|
Hip belt wraps snugly with padding centred on hip bones |
Hip belt slipping down, gapping at the sides, or digging into your lumbar area |
|
Pack feels stable during movement; no sway |
Pack swaying side to side when you turn or lean |
|
No numbness or tingling in hands or arms |
Tingling in fingers (nerve compression from poor shoulder strap fit) |
|
Load lifters create a visible 45-degree angle |
Load lifters hanging slack or pulling shoulder straps off your shoulders |
Women's-specific packs feature shorter torso lengths, narrower shoulder straps shaped to avoid breast tissue, and hip belts contoured for wider hips. Youth-specific packs scale everything down. These aren't marketing gimmicks; they address real anatomical differences. If a unisex pack fits you well, use it. If it doesn't, try a gender-specific or youth model before assuming the brand isn't for you.
When trying packs at stores like REI, ask to load the pack with realistic weight (at least 7 to 10 kg, or 15 to 22 lbs). Walk around the store. Go up and down stairs. Bend forward. Twist. A pack that feels fine empty may feel completely different loaded. Give it at least 15 minutes.
How Much Should Your Pack Weigh When Loaded?
There's no single magic number, but there are practical ranges that most hikers find comfortable:
- Day hikes: 4 to 8 kg (roughly 9 to 18 lbs) is typical, including water.
- Weekend backpacking: 10 to 16 kg (22 to 35 lbs) covers most setups.
- Multi-day backpacking: 13 to 20 kg (28 to 44 lbs) depending on food carry and gear bulk. Experienced ultralight hikers aim for base weights (everything minus food and water) under 4.5 kg (10 lbs).
When total pack weight approaches 50 or 60 pounds, comfort drops sharply, and injury risk rises. If you find yourself at those numbers, revisit your kit list before buying a bigger, beefier pack. Most modern backpacking packs are designed to carry 15 to 25 kg comfortably; pushing beyond that range, even with a good suspension, invites trouble.
Weigh your fully packed kit on a bathroom scale or luggage scale before you hit the trail. It's a useful reality check, and it helps validate that your pack's suspension is rated for what you're asking it to carry.
What Back System Should You Choose (Foam Padding vs Air-Ventilated Designs)?
This is one of those topics that generates surprisingly strong opinions among hikers. The choice matters, and it depends on where and how you walk.
|
Back System |
How It Works |
Best For |
Trade-offs |
|
Standard foam padding |
Dense foam contoured to the back, pack sits directly against your body |
Heavy loads, technical terrain, scrambling, winter use |
Less airflow; back gets sweaty in warm conditions |
|
Air-ventilated (trampoline mesh) |
Tensioned mesh panel holds the pack body away from your back, creating an air gap |
Hot and humid conditions, summer hiking, sweaty hikers |
Slightly less stability with heavy loads; can reduce effective pack volume by 3 to 5 liters; taller carry profile |
|
Hybrid designs |
Channelled foam with ventilation grooves or partial mesh panels |
Versatile; good compromise for most conditions |
Neither as stable as full foam nor as breathable as full mesh |
If you hike primarily in the southeastern U.S. in summer, a ventilated back system can meaningfully reduce the "swamp back" factor. If you're hauling a heavy load through the Cascades or scrambling in the Whites, a closer-carry foam system feels more stable and secure. The back system also interacts with torso sizing, so an adjustable suspension that lets you fine-tune the fit is particularly valuable on packs you'll use across seasons and terrain types.
Should You Choose Different Backpacks for Day Hiking vs Overnight Backpacking?
It depends on how often you do each activity. If you hike day trails every weekend but only backpack twice a year, owning a dedicated day pack (20 to 30 liters, lighter, simpler) makes sense. The lightweight suspension and quick-access design of a good day pack is genuinely nicer for shorter outings than cinching down a half-empty 60-liter backpacking pack.
If you backpack frequently, a versatile pack in the 40 to 55 liter range with good compression straps can work for both purposes. Compressed down, it serves as a generous day pack. Opened up, it handles weekend trips with a reasonably compact kit.
- One-pack approach: Works well if you pack light and don't mind a slightly heavier pack on day hikes. Good compression straps are essential.
- Two-pack approach: Better if your day hikes and backpacking trips have very different demands, or if you want to optimise comfort for each.
I walked the Camino Francés with a 38-liter pack that was, frankly, perfect for that particular trip. Lightweight, good hip belt, nothing fancy. But I wouldn't take it into the Colorado backcountry for a week. Different trips genuinely need different packs, unless you're willing to compromise in one direction or the other.
How Do You Test and Finalise Your Backpack Choice Before Committing?
Don't buy a pack online and hit the trail the next weekend. The test phase is where most people skip steps and later regret it.
- Load the pack with expected weight (use books, bags of rice, or your actual gear) and walk for 15 to 30 minutes. Around the block, up and down stairs, whatever simulates trail movement.
- Check the adjustability range: Can you get the hip belt snug on your iliac crest? Do the shoulder straps have room to adjust? Are the load lifters effective?
- Confirm access while wearing the pack: Can you reach your water bottle in the side pockets? Your phone in the hipbelt pockets? Your snacks? Your rain jacket?
- Practice packing it properly: Heavy items (water, food, cook kit) should sit close to your spine and centred between your shoulder blades and hip belt. Sleeping bag goes at the bottom. Often-used items stay accessible in the top lid, front pocket, or hipbelt pockets.
- Check return policies: Many retailers (REI included) allow returns within a generous window if you keep tags on and don't take the pack into the field. Test at home first. Walk around your neighbourhood. Make your decision before you hit the trailhead.
Choosing a pack is choosing a companion for every mile. Give it the time it deserves. Build your kit list, measure your torso and hip, try on two or three reputable models with realistic weight, and walk around long enough to know whether it fits. The right backpack isn't the most expensive or the lightest or the one with the most features. It's the one that disappears on your back when you're walking, so you can pay attention to the trail instead.
FAQ: Common Questions About Choosing a Hiking and Camping Backpack
How many liters do I need for a 2 to 3 night backpacking trip?
Most hikers find that 50 to 60 liters covers a 2 to 3 night trip with a standard sleep system, two-person tent, cook kit, and food. If you've gone ultralight with a compact sleeping bag, inflatable pad, and tarp or single-wall shelter, you might manage in 40 to 50 liters. Bulkier gear (synthetic sleeping bag, heavier tent, extra clothing) pushes you toward 60 to 70 liters. The answer always starts with your actual kit list.
Is an expensive backpack always better?
Not necessarily. Price often reflects the suspension system quality, fabric durability, and brand warranty. A £150 to £200 pack from Osprey, Deuter, or Berghaus will serve most hikers extremely well. Beyond that price range, you're typically paying for ultralight materials, specialised features, or premium design. If the pack fits your torso, transfers weight to your hips, and is built from durable fabric, it doesn't need to be the most expensive option on the wall.
What's the difference between a hiking backpack and a backpacking pack?
A hiking backpack (often called a day pack) is designed for comfort and quick access on shorter outings. It typically has lighter suspension, a simpler hip belt, and a volume of 20 to 35 liters. A backpacking pack is designed to carry overnight and multi-day gear, with a robust internal frame, a padded hip belt for true load transfer, and a capacity of 40 to 75 liters or more. The key difference is the suspension: a backpacking pack can comfortably carry 15 to 25 kg in ways that a day pack simply cannot.
Do I need an air-ventilated back panel?
If you hike primarily in hot or humid conditions and run warm, a ventilated back panel can meaningfully improve comfort. The trade-off is a slightly less stable carry feel under heavy loads and a small reduction in effective pack volume. For cold-weather hiking, technical terrain, or loads above 18 kg, a standard foam-padded back system often provides better stability and support for heavier loads. Many hikers find hybrid designs (channelled foam with airflow grooves) a good middle ground.
How do I know if my hip belt is the right size?
When properly fitted, the hip belt's padded wings should wrap around your iliac crest (the bony tops of your hips) with the buckle centred on your navel. You should have 3 to 5 inches of webbing remaining on each side after tightening. If the padding doesn't reach your hip bones, the belt is too small. If the buckle bottoms out with the padding nowhere near your hips, it's too large. The belt should feel snug and secure without pinching or creating gaps. Some brands offer swappable hip belt sizes to fine-tune the fit independently of the pack's torso size.



Leave a Reply