
What’s the most common injury experienced on the Camino de Santiago? Without a doubt, foot blisters!
- They’re painful.
- They’re frustrating.
- They take precious time, effort, and skill to look after.
- They make you walk differently and that can stir up other aches and pains.
- They can get infected, and wind you up in the hospital!
Blisters have the potential to spoil your Camino experience!
Whether it’s your first time, or you’re returning and hoping your feet can complete the journey less battered and bruised, you’ll probably do some blister research before you leave. Thankfully, there is an enormous amount of blister advice and opinion online. The problem is, much of it conflicting and it can leave you more confused than ever.
I’ve been there – and I’m a podiatrist! It can be tricky sorting fact from fiction when it comes to foot blisters. Out of necessity for my own blister-prone feet, I’ve researched widely and now specialize in helping active people manage blisters properly.
In the last few months, I’ve noticed an influx of inquiries from people from Australia and beyond seeking advice on how to prepare their feet for the Camino de Santiago. So I got in touch with Leslie and he has kindly invited me to share a few pearls of wisdom with you.

Take These 10 Blister Prevention Tips on Your Camino
1) AIM FOR DRY SKIN
Although it’s almost impossible to keep your feet bone-dry, your aim should be to keep them as dry as you reasonably can. Dry skin equals less friction, and that equals fewer blisters.
- Without a doubt, I always recommend moisture-wicking socks. Made from synthetic fibers and sometimes high-grade merino wool, they move moisture away from the skin. Don’t get socks with cotton in them. Cotton has the opposite effect – it keeps moisture trapped against your skin.
- A simple change of socks halfway through your day can make a big difference.
- Unless your skin is very dry, too dry, don’t moisturize your skin. Moisturizers increase friction levels.
2) SKIN TOUGHENING
A blister is an injury initiated by a tear under the skin surface. This tear is caused by the skin stretching too much, which causes the connections between skin cells to fatigue. Fluid fills the torn area and it makes the skin bubble up, forming the blister roof.
So it makes sense to try and toughen the skin and make it more resistant to this stretching, called skin shear. The only way to toughen your skin is to expose your feet to the amount of walking you’ll be doing on the trail. That includes training in your chosen shoes and on similar terrain.
- Well before the walk, decide on the footwear you’ll be wearing and get training in them. If you’re taking more than one pair, train in both.
- Depending on your situation at home, training for the conditions of the Camino can be tricky. And putting the hours on your feet just as difficult with our busy lifestyles. One thing I can tell you is, most blisters become apparent in the first few days. So if you’re expecting trouble because you haven’t been able to train, ease into it for the first week.
- Some people like soaking their feet in witch hazel, surgical spirit, white vinegar, cold black tea or other concoctions thinking they toughen the skin. Although these astringents don’t toughen the skin, they do dry it out and that’s still a good thing, at least in the short term.
3) BOOTS VERSUS ATHLETIC SHOES
This is an entirely personal preference. Either way, they must fit well. This starts with getting the length right. Ever heard of the rule of thumb? When it comes to fitting footwear, this refers to having the width of your thumb between the end of your longest toe and the end of the shoe’s upper. Any less and there’s not enough room for your toes.
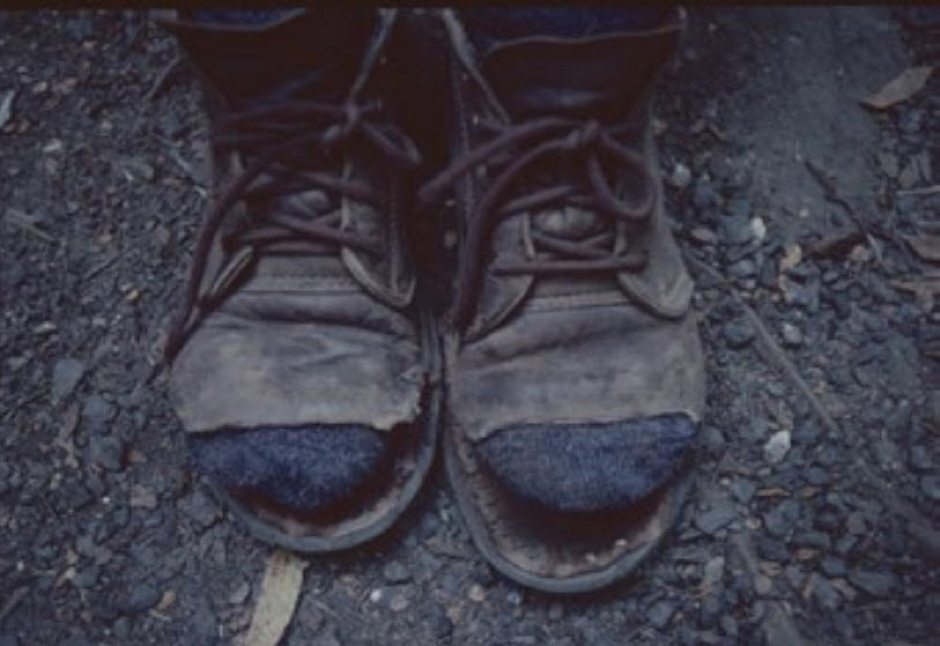
Use the rule of thumb to ensure your shoes or boots have enough room for your toes. This walker had to resort to cutting the toebox out of her boots to relieve her toe blisters. Picture by Stephen Lake.
There are three things you should consider in helping you make your decision.
- Comfort is (almost) Let this be a very big factor in choosing the footwear you’ll take with you. Studies show that how comfortable they feel when you first put them on and walk around is a good sign that shoe or boot is good for you.
- Water-proofed hiking boots intuitively sound like a good idea. And they can be a great idea if there is light rain and wet grass to walk through. But no boot is entirely water-proof. Think about water run-off from your legs, running down your socks and straight into the boot. And think about the eyelets (the holes your laces go through) – they’re entry points for water in saturating situations. Additionally, the more waterproof the upper of the boot is, generally, the less water is able to evaporate from inside to out. This means your perspiration is trapped within. If you have very sweaty feet, be prepared to stop to air your feet and change socks more often.
- Athletic hiking shoes with their mesh uppers allow sweat to evaporate out. But they put up next to no resistance to water getting in from the outside. They’ll allow more sand and dust into your shoe too, and that can be a problem on some terrains of the Camino. If you choose this kind of shoe, be prepared to stop to tip any foreign particles out. Additionally, athletic shoes won’t provide as much support to your ankle compared to a boot.
- You might decide to go with hiking sandals, such as Chacos, instead of shoes. In that case, read my guide on how to break in Chaco sandals.
4) SHOE SIZE AND SWELLING
Your feet will swell. They will probably swell so much as to mean the shoes that fitted you perfectly on day one will be too tight at some point later on. The issue will be width rather than length. This will mostly be an issue for toe blisters and edge blisters on the side of your forefoot. So what’s the solution?
- Be mindful of this when you are selecting your footwear. Choose a shoe that has a little bit more to offer in width than you would normally need. Some people go up a size to get that width and that usually works out fine, as long as you use your laces to keep a snug fit early on. Some people find they need to go up two or more sizes to get the width they need – I’m not so comfortable in recommending this. If you’re able to, just get a wider fitting. Or take two different pairs.
- Elevate your feet when you’re resting on the track or once you’ve finished for the day. Give that swelling every chance to go down as much as possible.
5) JUMP ON TO HOT-SPOTS
The key to a blister-free Camino journey is blister prevention. And your last chance for blister prevention is the hot-spot stage. A hot spot is a brief and subtle sensation of rubbing, irritation, or warmth. If you feel a sting, you’re too late – a blister is on the way. You need to stop and act immediately. Take your shoe off and take a look – what’s going on in there? Tip any sand out, check your sock isn’t bunched up or threadbare, firm up your laces … it all depends on what’s going on. Place a piece of tape over your hot spot, or your favorite greasy lubricant, or whatever you have planned for this blister location.
6) TAPING
Everyone takes tape, don’t they? Something to stick over a hot spot? Many times, that’s all it takes. The type of tape is entirely up to you. Test several when training.
- Fixomull is a thin and flexible one, good for going around fiddly bits like toes, and it has a strong adhesive.
- Paper tape is thin but not as stretchy and doesn’t stick quite as well as Fixomull.
- You could try one of the Kinesio tapes like RockTape or KinesioTex tape. They’re a bit thicker yet very flexible.
- Rigid sports tapes can help but are tricky to apply to small fiddly areas like toes.
- Then there’s moleskin and fleecy web which are thicker again.
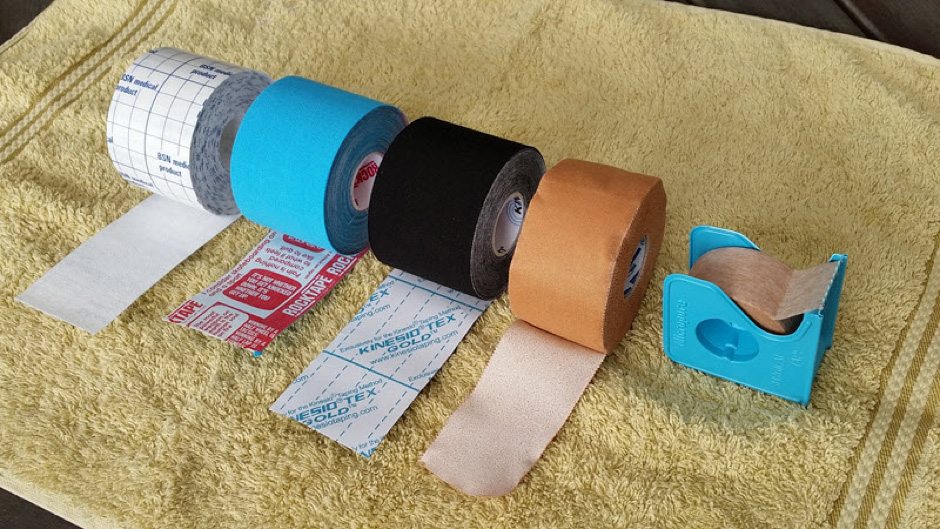
From left to right: Fixomull Stretch, RockTape, KinesioTex, Leukoplast rigid tape, 3M surgical paper tape.
Whatever you do, don’t stick any of these tapes directly over your blister – because it will rip the roof off your blister when you go to remove the tape. If you have a blister, in the majority of cases, you’ll need to use an island dressing. An island dressing has a non-adherent pad in the middle and adhesive all the way around to secure it in place and keep the germs out. There is another type of blister dressing called hydrocolloid dressing. Compeed is a popular one on the Camino. You’ll hear a lot of conflicting advice about this dressing – some love it, some hate it. I’ll tell you why, next.
7) THERE ARE THREE TYPES OF BLISTERS!
Not all blisters are created equal. In fact, there are three types of blisters, each requiring a different type of treatment. You have to match the right treatment to the right blister, or you’ll turn a bad situation into a terrible one. The three types of blisters are based on the integrity of the blister roof:
- Roof intact
- Roof torn
- Deroofed

The 5 stages of the blister process: The first two are your opportunities for blister prevention. The remaining three are where you’ll be performing blister treatment.
The most common mistake I see is the incorrect use of Compeed or any other hydrocolloid dressing. Never use Compeed on an intact or torn blister – it will simply rip your blister roof off when you go to remove the dressing. And don’t use Compeed expecting it to prevent blisters – it won’t. You can still blister under the Compeed and that is not fun! Compeed should only ever be used on a deroofed blister. The weepiness of the raw blister base prevents the dressing from sticking to it. Plus it provides the perfect moist environment for skin healing.
8) POPPING BLISTERS
In the ideal world, you wouldn’t pop a blister. You’d leave the skin intact so there’s no possibility of it getting infected. And you’d take it easy for a week or so and let it heal in due course. On the Camino, that’s probably not going to happen, and so puncturing and draining your blister can be a good idea. But you have to consider your situation carefully. The benefits will only outweigh the risks if you know how to treat a torn blister properly and have the equipment required to do the job. Use a sterile piercing implement (I use a scalpel blade), a clean technique (have you got your antibacterial hand gel), and antiseptic liquid over your blister (to prevent infection).
9) BLISTER KIT CONTENTS
Although you’ll do your best to prevent blisters from happening in the first place, anticipate blister trouble. Have a fully-stocked blister kit with enough tape, dressings, antiseptic, and everything you’ll need for dealing with hot spots and treating all three types of blisters. On top of the general blister kit gear, consider a few items that will give you advanced blister management capabilities. Consider taking thick orthopedic felt, ENGO Patches, silicone gel toe sleeves or caps, and sterile scalpel blades.
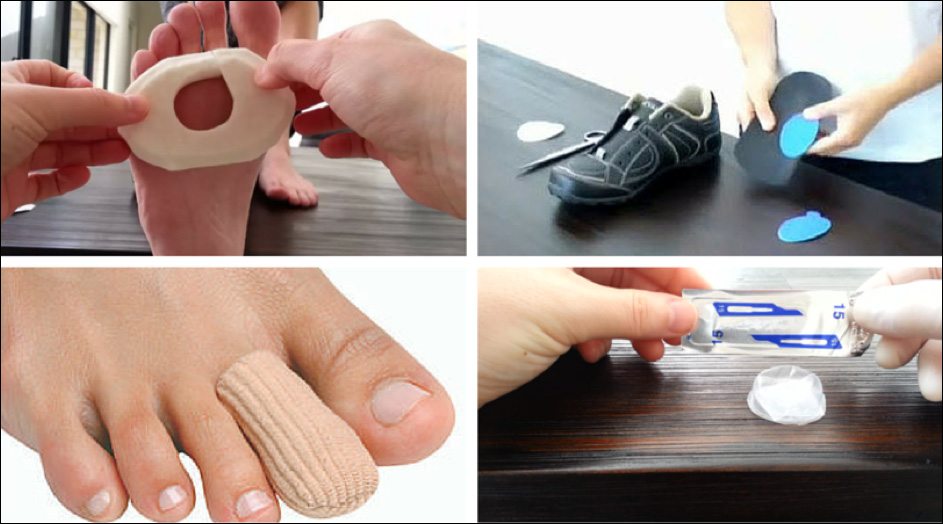
Thick orthopedic felt for donut pads; ENGO Patches for reducing friction levels between your sock and the shoe or insole; silicone gel toe covers for absorbing shear; and sterile scalpel blade for lancing blisters.
10) BUILD A BLISTER PLAN
The Camino is neither the time nor place to start experimenting. Sure, you may have to try something new if you find yourself in the worst possible situation with blisters. But a better approach is to experiment in the weeks and months preceding your trip. This is how you build a rock-solid blister plan. Take into account your blister history – these are the blisters you can expect to be troubled with on your walk. Start on day one with your tried and trusted preventive strategy in place. And keep a little something extra up your sleeve for these blister locations, just in case. In addition, you’ll need a plan for the blisters you’ve never had before. Because let’s face it, unexpected things happen out there.
WRAPPING UP
Don’t let foot blisters spoil your Camino adventure. Do your best to prepare well before you leave. Prepare your feet, your blister kit, your blister plan. Don’t ignore hot spots. And master the art of blister treatment. Health care along the Camino is good, Spain has a modern health system.
I love hiking, backpacking, and camping. From the Camino de Santiago to the West Highland Way in Scotland or simply a great day hike on the weekend. Hiking refreshes me, my mind, and keeps my body reasonably fit. So far I have walked three Camino routes and many other long distance hikes in the UK, Canada, and around the rest of Europe. One of the best was my hike up Ben Nevis.
Thank you Leslie for putting me on to Rebecca Rushton BSc(Pod)! Found out there are many things I can do to prevent my pinch blisters. I have almost a year to try them out on my training walks before the main event next year!
Thank you so much for these tips, Leslie. I am preparing for a Camino walk in 2023.
I disagree about the restrictions on Compeed. I used the Euro variety on intact blisters and did not take them off. Eventually they will fall off and the liquid would be absorbed from the blister, the skin never did peel. The US product simply does not stay on and when the edges come loose, you risk peeling off the delicate skin that covers. The only fix I have found for that is to use kinesiology tape over so it doesn’t tear off
Agree with this advice(I’m a podiatrist too!) and would add one thing that I always do. Every night after washing and drying my feet, especially between the toes, I swab my feet with surgical spirit allowing it to air dry. (I note that you mention soaking with surgical spirit but I just wipe.)
This really helps as my feet get sweaty and moist skin drags and blisters.
Not to detract from your excellent article, especially the use of compeed. I saw some nasty results of inappropriate application.
Armorel
My main foot issue while hiking involves the calluses on the balls of my feet, and when it comes to soreness and tearing, it does not help that I am on a blood thinner. Recently in Spain a pharmacist introduced me to Compeed callus plasters. I had not previously noticed them in US pharmacies, but unlike blister plasters, the callus versions are designed to be applied over intact skin to help cushion and protect. For me, at least, this was a wonderful discovery.
Thank you. I’ll try some of these new ideas before my next (3rd) Camino. Also I might add if you take some time before your hike to walk around with your full pack, you will allow your feet to get use to the extra weight which can cause the blisters. Take care before you go
I heard on a camino podcast (do not remember which one!) about a product referred to as New Zealand Wool. I bought mine on Amazon and managed to do the Portuguese Camino from Porto without any blister issues. The product encourages you to use a piece of the wool as a cushion for any hot spots. I found this very effective to help with my journey.